This article explains how to adjust the extended bucket wear pads for 3CX – 4CX – 214 – 214e – 215 – 217jcb backhoe loaders
06.2025 JCB ServiceMaster 4 v25.3.3 Diagnostic Software with SW Files Download and installatiom
The Extradig dipper wear pads are bolt-on replaceable
items. They support and guide the inner dipper section
during extension and retraction. The following procedures
explain how to inspect, and where applicable, adjust the
pads.
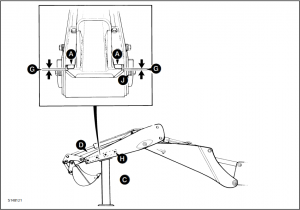
There is a front and rear set of pads, each set comprises top
wear pads A and bottom wear pads B
The top wear pads A are not adjustable and must be
replaced with new pads once they have worn to their limit.
See Inspecting the Top Wear Pads.
The bottom wear pads B are adjustable and take up the
wear on both the top and bottom pads. They must also be
replaced with new pads once they have worn to their limit.
See Adjusting the Bottom Wear Pads.
New wear pads A and B must be replaced as a set and
fitted by a qualified service engineer.
Inspecting the Top Wear Pads
1
Park the machine on level ground. Engage the parking
brake and put the transmission in neutral.
2
Position the boom and dipper as shown at C. Retract
the Extradig dipper D. Make sure that the bucket is
clear of the ground and the dipper is supported.
3
Stop the engine and remove the starter key.
Renew the pads when, or before they are worn down to the
depth of the recess/chamfer as shown at E. If the pads are
worn near to their limit then inspect them more frequently
than recommended in the Service Schedules. To avoid
damage to the dipper or wear pad make sure the pads are
fitted the correct way round as shown at J.
06.2025 JCB ServiceMaster 4 v25.3.3 Diagnostic Software with SW Files Download and installatiom
Torque Settings
Item Nm kgf m lbf ft
F 56 5.7 4
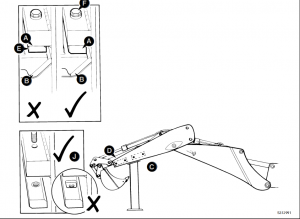
Adjusting the Bottom Wear Pads
1
Park the machine on level ground. Engage the parking
brake and put the transmission in neutral.
2
Support the boom and dipper as shown at C.
3
Stop the engine.
4
Clean the sliding faces of the inner dipper with a
suitable solvent.
5
Start the engine. Retract the Extradig dipper D. Make
sure that the bucket is clear of the ground and the
dipper is supported.
6
Stop the engine.
7
With grease, mud etc. removed from the sliding faces
visually check the gap between inner dipper and top
wear pad A, as shown at G. The gap should be no
greater than 1.5 mm (1/16in)
If the gap is greater than 1/
16in (1.5 mm) then adjust as
follows:
a
Remove one adjusting bolt H and discard one
washer J.
b
Refit and tighten bolt H.
c
Repeat the procedure for the remaining 3 adjusting
bolts H on the same side of the dipper.
d
Visually re-check the gap is no greater than 1.5 mm
(1/16 in) as shown at G, if necessary repeat steps a
to c for the other 4 bolts H on the opposite side of
the dipper.
e
Make sure that the inner dipper seats central to the
sides of the outer dipper.
Note: Remember to alternate sides each time an adjustment
is made.
Note: When all the adjusting washers J have been removed
and the clearance is greater than 1.5 mm (1/
16
in), then wear
pads A and B must be replaced as a set and fitted by a
qualified service engineer.
When the adjustments have been completed, apply Waxoyl
to the runners of the inner dipper.