How to correctly remove and install a glass panel glued to the cab frame hole on a JCB 3CX – 4CX – 214 – 214e – 215 – 217 backhoe loader
JCB Electronic Service Tool Diagnostic Kit High Quality
The following procedures explain how to correctly remove
and install panes of glass that are directly bonded to the cab
frame apertures. When carrying out the procedures, relevant
safety precautions must be taken:
1 Always wear safety glasses during both removal and replacement.
2 Use protective gloves – heavy duty leather gauntlet type gloves when cutting out the broken glass; ‘non-slip’
type gloves when handling/moving panes of glass; surgical type gloves when using the polyurethane adhesives.
3 Wear protective overalls.
4 DO NOT smoke – the activators and primers used in the procedures are highly flammable.
5 Do not attempt to handle or move panes of glass unless you are using glass lifters (see Service Tools)
Removing the Broken Glass and Old Sealant
Several special tools are required to successfully complete
the removal and replacement procedures. Reference is
made to the tools in the text. The majority of these tools can
be obtained locally and the remainder from JCB Service
(see Service Tools).
The work must only be carried out in a dry, frost free
environment. A protective canopy may be required or the
machine/frame must be moved to a sheltered area. In damp
or wet conditions, hinged doors and window frames can be
removed from the machine and taken to a more suitable
(dry) environment.
Glass should not be replaced at temperatures below 5°C
(41°F)
Note: The front screen glass is laminated, the other glass is
toughened. If a laminated pane breaks it will stay in one
piece even though the glass is cracked. A toughened pane
will shatter and fall apart. The method of removal of the
glass depends upon which type it is. See WARNING below.
! WARNING
Always wear safety glasses when removing or installing
screen glass. Never use a power operated knife when
removing the sealant around a toughened glass screen.
The action of the knife could cause particles of glass to
be thrown with sufficient force to cause serious injury,
even when safety glasses are being worn. Use only hand
operated tools when working with toughened glass.
Removing the Broken Glass and Old Sealant (cont’d)
1
Position the machine on level ground and apply the
parking brake. Stop the engine. Put protective covers
over the cab seat and control pedestals.
2
a Laminated glass – leave installed until the old
sealant has been cut away, after which it will be
possible to lift the broken screen away from its
frame housing in one piece.
b Toughened glass – remove as much of the
shattered glass as possible prior to cutting out the
old sealant.
3 Cut out the old sealant, leaving approximately 1 to 2
mm on the cab frame. There are several tools and
techniques for doing this:
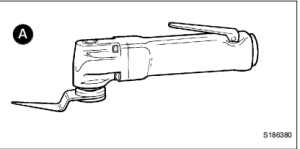
a
Pneumatic Knife A provides one of the easiest
methods of removing the sealant around laminated
glass. The tool, powered by compressed air,
should be sourced locally.
Note: This tool must not be used on toughened glass (see
WARNING on previous page).
1 Press the handle to start the knife blade oscillating.
2 Insert the knife blade into the sealant.
3 Slowly move the knife along the sealant with the
blade positioned as close to the glass as possible.
Do not allow the knife blade to overheat or the
sealant will melt.
06.2025 JCB ServiceMaster 4 v25.3.3 Diagnostic Software with SW Files Download and installatiom
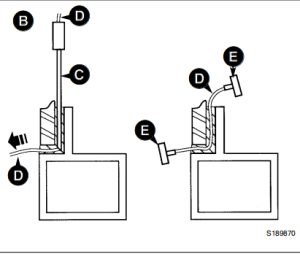
b Braided Cutting Wire and Handles B. This method
uses a 3-core wire, a wire starter tube and two
handles (see Service Tools).
1 Insert the steel tube C into the old sealant on the
inside of the glass.
2 Insert the braided cutting wire D down the centre of
the steel tube. If necessary, from the outside, cut
out local sealant at the point of the tube to gain
access to the wire.
3 Using suitable pliers, pull the cutting wire through
the sealant to the outer side of the glass.
4 Secure each end of the braided cutting wire in the
special handles E.
5
Move the cutting wire backwards and forwards in a
sawing motion and at the same time gently push or
pull the wire to cut through the old sealant.
Direct Glazing (cont’d)
Removing the Broken Glass and Old Sealant (cont’d)
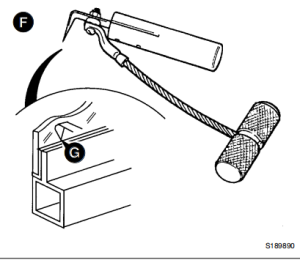
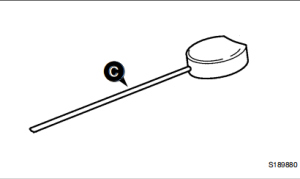
c Cut-out Knife F. The cut-out knife can be used as a
left handed or right handed tool. For the knife and its
replaceable blades, refer to Service Tools.
(i) Insert the knife blade into the sealant.
(ii) Make sure that the blade of the knife is against
the glass as shown at G.
(iii) Use the ‘pull-handle’ to pull the knife along and
cut out the old sealant.
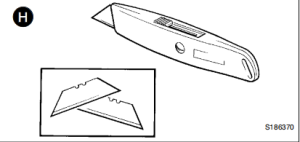
d
Craft Knife H. The blades are replaceable.
(i) Insert the knife blade into the sealant.
(ii) Pull the knife along and cut out the old sealant.
Note: There are other tools available to cut out the old
sealant. For example, there is a long handle type craft knife
to give extended reach. Refer to Service Tools, for details of
this and any other tools.
4 a Laminated glass – lift out the broken pane using
glass lifters (see Service Tools).
b Toughened glass – remove the cut off sealant and all
remaining particles of shattered glass.
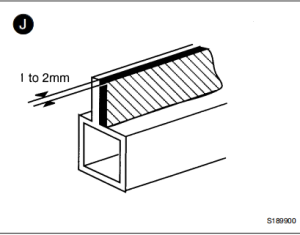
5 If necessary, trim off the remaining old sealant to leave
approximately 1 to 2 mm on the upright face of the cab
frame aperture, as shown at J.
6 Apply a coat of ‘Black Primer 206J’ to the paintwork if:
a Paintwork was damaged or scratched during the
glass/sealant removal procedures.
b The old sealant was inadvertently cut back to the
cab frame during the glass/sealant removal
procedures.
Preparing the Cab Frame Aperture
1 If damp or wet, dry the aperture area using a hot air gun
(sourced locally).
2 Use ‘Active Wipe 205’ to thoroughly clean and ‘prime’
the trimmed sealant. Use a lint free cloth to apply the
‘Active Wipe 205’, allow 5 minutes flash off (drying)
time.
Note: Do not use any other type of cleaning fluids, otherwise
they may be absorbed into the old sealant and ultimately
prevent the new glass from bonding.