
Disassembly Procedure
Begin:
Caterpillar ET 2025A & 2019C Electronic Technician Diagnostic Software
a. Remove the fan and fan pulley. Refer to Disassembly and Assembly, “Fan – Remove and Install”.
NOTE Keep all parts clean and free of foreign matter.
Foils will cause rapid wear and shorten component life.
NOTE
Always be careful to ensure that fluids are contained when inspecting, servicing, testing, adjusting, and repairing the product.
Be prepared to collect the fluid in a suitable container before opening any chamber or disassembling any component that contains fluids.
Dispose of all fluids in accordance with local regulations and directives.
1. Drain coolant from the cooling system into a suitable container to store or discard the coolant. Refer to the Operation and Maintenance Manual, “Cooling System Coolant – Change” for the correct procedure.
2. Loosen the hose clamp and remove the hose from the water pump inlet.
Caterpillar CAT Communication Adapter 3 Control Group (478-0235) High quality with CAT ET 2019C software
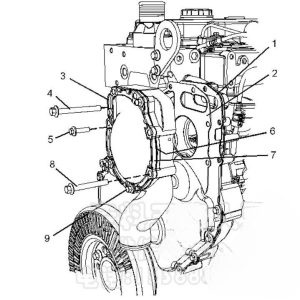
3. Remove bolts (4), (5), and (8). NOTE: The bolts come in three different lengths. Note the locations of the three different length bolts.
4. Remove the water pump (3) from the front cover (1). NOTE: If necessary, tap the water pump with a soft hammer to loosen it.
5. Remove the gasket (2).
6. If necessary, remove the cover from the water pump. Follow steps 6.a through 6.c to remove the cover.
a. Remove the bolts (9).
b. Remove the cover (7).
c. Remove the gasket (6) (not shown).