Removal and Replacement
JCB Electronic Service Tool Diagnostic Kit High Quality
Removal
! WARNING
Make the machine safe before working underneath it.
Park the machine on level ground, lower the arms. Apply
the parking brake, put the transmission in neutral and
stop the engine. Chock both sides of all four wheels.
Disconnect the battery, to prevent the engine being
started while you are beneath the machine.
GEN-1-2
JCB ServiceMaster/WinEEM4 KG v2 Keygen
1
Operate the control levers to vent residual pressure.
2
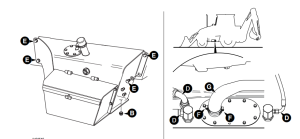
Remove the filler cap and unscrew plug B to drain the
tank.
3
Disconnect and plug the hydraulic hoses D from the
rear of the tank.
Note: Some machine variants may have different return
hose configurations at the tank to those illustrated. Be sure
to disconnect all hoses.
4
Loosen the 2 clips F on the suction hose G. Pull off the
hose at the tank.
5
Support the tank, then unscrew mounting bolts E and
lift tank away from the machine.
Replacement
Replace the tank by reversing the removal procedure.
If a new tank is being fitted, remove the tool box from the
old tank and fit to the new tank.
Apply JCB Threadlocker and Sealer to drain plug B.
When refitting the suction hose G make sure it is correctly
fitted and phased on the tank spigot. There must be at least
12 mm (0.5 in) clearance between the hose and the gearbox
casing. Phase the 2 clips F 180o apart.
Refill with clean hydraulic oil as specified, refer to Section 3
Fluids, Lubricants, Capacities and Specifications.
Operate the machine until the hydraulic oil reaches
operating temperature (50 o C, 122 o F). Stop the engine and
check for leaks.
Torque Setting
Item Nm lbf ft kgf m
B
100 73.76 10.20
F
5 4 0.5
07.2026 JCB ServiceMaster 4 v26.7.1 Diagnostic Software with SW Files Download and installation