
The unit injection pumps used on the BFM1013 diesel engine are critical components of the fuel supply system. Each unit pump is independent of the others and controlled by a single fuel supply rack. Each unit pump is installed in a corresponding mounting hole on the left side of the cylinder block, secured by two fixing bolts and driven by a corresponding cam on the camshaft, thus providing separate fuel injection.
Deutz Diagnostic Tool Communicator for Deutz Engine DECOM Controllers
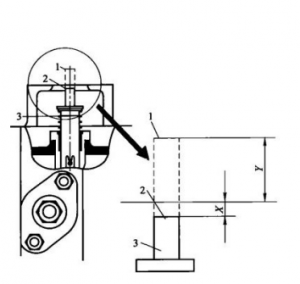
Figure 1-27 Adjusting the Fuel Rack of a BFM1013 Diesel Engine 1—Fuel Rack Stroke (dashed line); 2—Stop Position; 3—Fuel Rack; Y = Rack Stroke; X = 0.3 to 1.3 mm
2024 Deutz SerDia 4.0 SerDia2010 14.1.9.3 Highest Level 6 Diagnostic Software
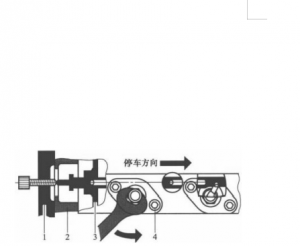
Figure 1-28 Installing the Unit Pump 1—Rack Positioning Tool; 2—Casing; 3—Fuel Rack Guide Sleeve; 4—Unit Pump Fastening Bolts
According to the installation instructions in Figure 1-28, the correct installation procedure is as follows. ① After the diesel engine is turned off, place the fuel injection pump speed control rack in the stop position. Use a bolt from a special tool to hold the rack in place from the end to prevent movement in the fuel supply direction, maintaining the single pump in its original assembly position. ② Install the unit pumps one by one. Turn the drive cam under the unit pump to its base circle position, then place the adjusted unit pump into the unit pump hole in the cylinder block. ③ Pre-tighten the unit pump’s mounting bolts with a torque of 5 N·m. Then, loosen them approximately 60° in the opposite direction. Use a torque wrench to try to rotate the unit pump, accurately reading and recording the torque M. ④ Use a wrench to slowly rotate the unit pump counterclockwise until it stops. ⑤ Turn the unit pump counterclockwise until the torque reaches (M+1) N·m, then cross-tighten the unit pump’s mounting bolts. ⑥ Tighten the unit pump’s mounting bolts alternately in three steps, with tightening torques of 7 N·m, 10 N·m, and 30 N·m. ⑦ After assembly is complete, loosen the bolts on the special tool and remove the tool to restore the original assembly.